Members of the trumpet section that recorded the soundtracks for Star Wars – Episodes 7, 8 & 9 joined host John Snell for a live question & answer session, including Jon Lewis, Barry Perkins, David Washburn, Daniel Rosenboom, Jim Grinta & Rob Schaer. We covered questions covering what it was like working with composer John Williams, trumpet warm-ups & routines, advice for young players who want to be studio musicians, and so much more.
Most trumpet mouthpieces are made out of brass that is silver plated. Some mouthpieces are made out of other materials such as plastic, steel, or titanium. We recently had a client who requested we make a custom rim out of the precious metal sterling silver. Sterling silver is 92.5% silver and 7.5% of other metals, usually copper.
Sterling silver is about 25% denser than brass providing the benefits of a heavier mouthpiece without adding volume to the blank shape. It also has beneficial resonant qualities.
Sterling silver is rarely used in mouthpiece manufacturing due to its expense and because it is extremely difficult to work with. We were honored that our client trusted it with several hundred dollars of material that was masterfully hand carved by our own Brett Kendall.
Here’s a video that takes you behind the scenes of the process:
A lot of great, in depth work has been done about the trumpet mouthpiece gap. Unfortunately, many of the frequently cited formulas and studies on the gap have inherent problems that create erroneous results, which when relied on, will deter trumpet players from achieving optimum results with their equipment. I’ll address three of these inherent problems here.
Problem #1 – Failure to Take The Player Into Consideration
As we have written about previously, a proper study on the gap must include all three essential elements of the system – the trumpet, the mouthpiece, and the player. Having helped thousands of players through the years to fine tune their gap, we have no doubt that the player is the most important variable of the Player-Trumpet-Mouthpiece System.
No gap formula or theory to date has been able to calculate what a player feels, and most importantly, what a player prefers to feel. Yes, there are certain generalizations about the gap and ranges of sizes that many players fall into.
Relying on these generalizations is as silly as blindly buying a men’s size 9 or 10 shoe because that’s the range of shoe sizes most commonly sold, even though you are a woman who wears a woman’s size 8.
Relating this back to the gap:
Find the gap that plays the best for you, not what someone else told you should feel the best for you.
Problem #2 – Failure to Take Changes in the Equipment Into Consideration
We know that a change in the gap changes the acoustical impedance in the Player-
Trumpet-Mouthpiece System. It is also well settled that there are thousands of other variables in the mouthpiece and trumpet that can change the acoustical impedance in the System.
Due to the nature and limitations of mouthpiece and instrument manufacturing, it is impossible to consider every variable that affects acoustical impedance. Put another way, it is impossible to isolate and therefore calculate, what the gap should be considering every variable.
The gap formulas and theories sometimes attempt, but do not succeed in addressing every variable in the equipment and therefore cannot predict anything with any consistency.
Problem #3 – Failure to Take The Environment Into Consideration
While the first two problems on this list are the most important inherent problems in any gap formula or theory, the third problem — considering the environment — is worthy of a mention.
For argument’s sake, let’s say that we can calculate an optimal gap considering the player, the mouthpiece, and the trumpet. We know that the acoustical properties of the environment you are playing in can affect the acoustic impedance you feel as a performer.
Playing outside in hot, humid weather and then moving inside a air-conditioned, dry, acoustically “stuffy” room can drastically change the acoustical impedance, and in turn, what you feel.
In today’s musical climate, you could easily find yourself in a stuffy recording study, then in a huge, open cathedral. While most players would not think to adjust the gap in these situations, a significant minority of players have fine-tuned the gap to their varying situations.
Experiment with the gap using the Reeves Paper Trick!
Let’s face it, the trumpet can be a beast sometimes — stuffy low notes, tight high notes, quirky notes that just don’t settle or play in tune. While there is no substitute for diligent practice, there are always ways to make the trumpet easier. Maybe even a lot easier!
What if we told you that with this one simple trick, you could make one or more of the following improvements to your trumpet playing immediately:
better intonation
more open feel
better projection
cleaner articulation
more secure slotting
This may sound too good to be true, but we see these results with our customers every day and have for the past 50 years!
So what is this magic trumpet trick?
The Bob Reeves Brass Paper Trick
Here’s how to do the Bob Reeves Paper Trick yourself:
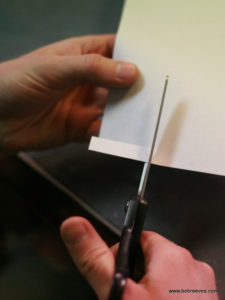
Take a sheet of paper and cut off a small piece. It should be about 3/4″ long and only about 1/8″ wide. Set the piece of paper aside.
Play an exercise that covers your comfortable range. It should include some articulation.
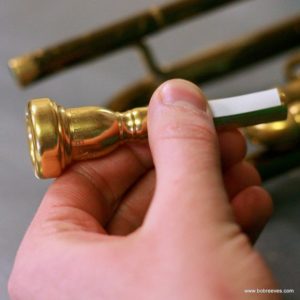
Remove your mouthpiece and place the paper length-wise on the side of the shank of the mouthpiece.
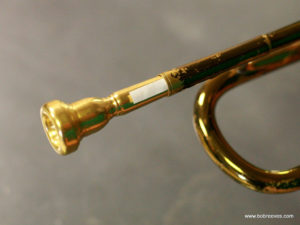
Put the mouthpiece and the piece of paper into your trumpet receiver.
Play the exercise again.
Note what changes you hear in your sound, articulation, slotting, and feel.
“I’ve Done The Paper Trick – Now What?”
One of three things will happen:
It will play better with the paper.
It will play worse with the paper.
You won’t notice a difference.
If it plays better (#1), then you need a larger gap on your mouthpiece. This can be achieved by altering your mouthpiece and getting a removable sleeve at the larger size. If you don’t want a removable sleeve, we can re-shank your mouthpiece to that larger size while keeping the shank solid.
If it plays worse (#2), you might need a smaller gap. This can be achieved by machining down your shank, or by converting your mouthpieces for Reeves Sleeves and experimenting with smaller sleeve sizes.
If you don’t notice a difference (#3), try the experiment again, this time adding a second piece of paper on top of the first. Keep repeating until it plays better or worse.
How Does the Gap Work?
How can this simple trick improve your trumpet playing? The short answer is that it allows you to experiment by changing the gap between your mouthpiece and the leadpipe, which is an often neglected, yet crucial element of your playing setup.
Some tips on doing The Paper Trick:
record yourself and listen back
have someone else listen to you in front of the bell
use the paper trick on all your mouthpiece and trumpet combinations
Paper Trick Video:
Exploring Deeper into the Trumpet Gap
If you would like to learn more about the gap, here are some additional blog posts you can read:
One of the most talked about aspects of trumpet equipment over the last few years has been the annulus, or gap, and rightly so because it can have a huge impact on how your trumpet and mouthpiece play.
Unfortunately, there is a lot of confusion and plain old misinformation that gets passed around making a relatively simple adjustment much more complex than necessary.
Don’t worry, we are here to help by dispelling some of the popular myths about the trumpet gap.
1. “I measured my trumpet gap and it is .1845 inches (4.686mm), that must be too big.”
False! Due to a combination of all the factors involved — you, the mouthpiece, and the instrument — it is very possible that a gap that large, or even larger, may be optimal. Yes, it is possible that size of gap is too large, but you won’t know by just looking at the measurement by itself.
2. “I must use a #5 sleeve on all of my horns.”
False! While this may coincidentally true for some, there is no sleeve that magically works on every trumpet. There are many reasons for this: receivers are not standardized among trumpet manufacturers, factory tolerances for setting trumpet receivers are larger than the minimum amount that most players can perceive, and no two trumpets are built exactly alike thus having different playing characteristics.
3. “Adjusting the gap is a relatively new concept.”
False! The effects of adjusting the gap go back over 40 years. Carroll Purviance found that a smaller shank size would help trumpet players playing on certain instruments. Bob Reeves revolutionized gap adjustment when he patented his adjustable mouthpiece sleeve system and designed the first adjustable gap receiver in 1971. Renold Schilke studied the gap and theorized than zero gap was best in his article from 1977. A comprehensive Master’s Thesis was done in 1980 by Dennis Fleisher while at Eastman School of Music.
4. “I am not advanced enough to notice any difference in the gap.”
False! We’ve found over the last 45 years of working with players daily that experience and skill does not correllate with the ability to perceive changes in the gap. Great players sometimes cannot feel huge adjustments in the gap, while young players can greatly benefit from small adjustments. The questions is: how much do you perceive changes in the gap? The answer is easy — experiment!
5. “Little to no gap is best.”
False! While a small minority of players play with little or no gap (and that may be you!), a vast majority of players prefer some gap and a significant percentage of players prefer a relatively large gap compared to what most standard setups create.
6. “I can figure out the gap by taking a few measurements and plugging it into a formula.”
False! No formula can properly take into account every variable that affects what the optimal gap should be, including the response of the instrument and the lip penetration into the mouthpiece of the player. At best, a formula can generalize what gap works best for you, but at worst it can send you in the wrong direction. Why? Because you can’t measure what you feel, and more importantly, you can’t measure what you like to feel when you play.
7. “It’s better to adjust the gap by moving the trumpet receiver than altering the mouthpiece.”
Usually false! The biggest drawback to adjusting your receiver is that it is more costly and risky to make a change to the trumpet as opposed to the mouthpiece. Also, even the best repair shops cannot set the receiver to the precision that we can make sleeves (adjusting the gap to within .001″). Receiver adjustments are best when you use only one mouthpiece on that particular instrument. If you use multiple mouthpieces (like a commercial mouthpiece and a classical mouthpiece), then it is best to leave the receiver alone and dial in the gap by adjusting the mouthpiece shanks.
8. “A mouthpiece cut for Reeves Sleeves loses energy or vibrations.”
False! When we cut a mouthpiece for sleeves, there is less than .001″ separation between the mouthpiece and the sleeve. Bob Reeves did extensive studies on this and concluded that, when machined properly, there is no acoustical detriment when converting a mouthpiece for sleeves.
9. “Receiver inserts adjust the gap the same way sleeves or resetting the receiver does.”
False! Receiver inserts are a crude way to adjust the gap, as they usually make adjustments several times the amount that a player can perceive. More critical, however, is that they also drastically alter the trumpet leadpipe by changing the air column design (the leadpipe is both lengthened and the shape changed by the addition of a cylindrical section).
10. “A Bach Strad (or insert any other model trumpet) always plays best with an 1/8″ gap.”
False! This thinking fails to consider the effects of the mouthpiece and the player (the most important factor!). It also assumes that all trumpets are built and play the same. Line of 10 of any specific make and model of trumpet and you’d be hard pressed to find any two that play alike.
11. “My trumpet teacher plays a #5.5 sleeve, so should I.”
False! While you probably should do what your trumpet teacher tells you during your studies, realize that this statement is just as absurd as saying, “My teacher wears a size 10.5 shoe, so should I.” Even if you follow your teacher’s routine, style, and sound concepts, you are still two different individuals with different physical builds, preferences, and equipment.
12. “I use a #5.5 sleeve, so should my student.”
False! Helping your student to think logically about their equipment and dial it in is a great asset for your student, however, forcing your student to play on exactly what you play does not do your student any favors. The best thing to do is spend 5 minutes in your lesson and experiment with with the Reeves Paper Trick. Your student may end up on the same sleeve as you, but if that’s true it will be for the right reason.
We’re already a few weeks in to 2020 and, if you’re like me, you’ve already dropped some of your New Year’s resolutions. But that’s OK. There’s no reason to wait until next year to jump back on that horse and start going forward again. Here are some tips I’ve put together that will help your trumpet playing this year. The goal here is not to try to do the entire list, in fact, not every tip may pertain to you. Just pick a few to work on and you’ll soon be reaping the benefits in your playing, and having more fun as well.
So, let’s get going:
1. Restarts are Okay!
Maybe it’s human nature, or maybe it’s just a trumpet player thing, but whenever I take a day or two off from playing I know the next day will be rough. And guess what? It usually was…until I discovered how strongly my thinking controlled the outcome of my practicing. Over the holidays when I had a few days off from playing I decided I would only think positively about the break. It would be a fresh start. It would allow me to refocus my energy on what I do well and unlearn some bad habits. Trumpet playing would be easier and effortless this time, not foreign, forced, and strident.
The results were astounding. I made breakthroughs in my playing that I had been working on for months and even years. What’s even more amazing is that this happened after a break from playing when I would have thought the exact opposite would have happened — I should have regressed in my playing.
Whether you are just getting back to it again after the winter holidays or are laid up with the flu, remember that restarts are okay with a positive mental approach.
2. Back to Fundamentals.
Spend some time this year going back to fundamentals (especially if you are following tip #1). I’m not talking about daily maintenance. I’m talking about going back to page 1. Spend time working on your sound production, your attack, and your breathing. Imagine if you could become 10% more efficient (creating more sound for less work), or be 10% more relaxed while you play? These improvements can only be made by playing fundamentals.
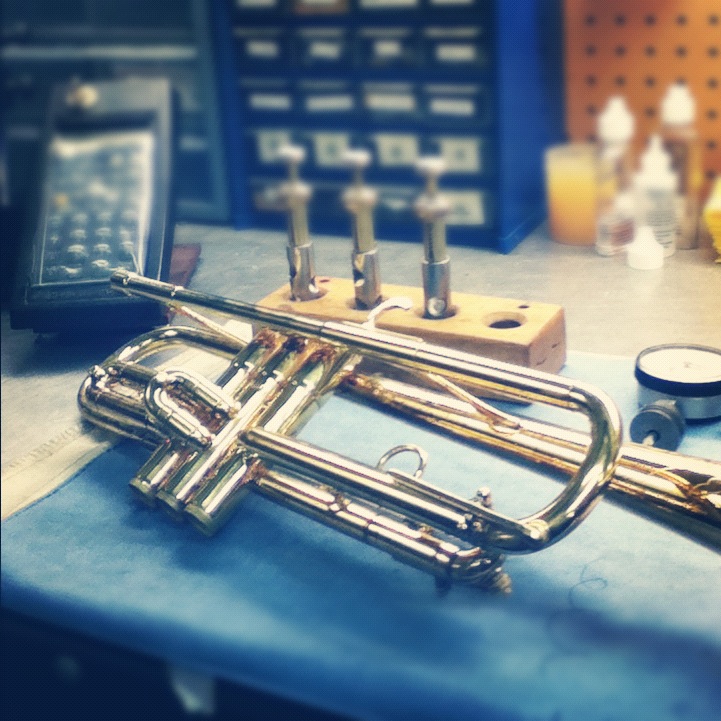
Taking a beautiful Martin Committee apart to clean.
3. Clean Your Trumpet & Mouthpiece.
This tip should be #1 and it will apply to probably 95% of you based on the horns we see here at the shop. Take 30 minutes of your week and give your horn a good bath. If you can’t do that, take it to a repair shop to have it acid washed or ultra-sounded.
Trumpet is hard enough to play consistently day-to-day. When the gunk inside your horn is constantly building up you are spending at least part of your practice time adjusting to it. Get rid of this variable by getting your horn back to the way it should play and maintain it by flushing it out every week. You can also keep a lot of stuff from building up in your horn by using a leadpipe swab after every practice session.
4. Have Fun!
The trumpet is a demanding, unforgiving instrument. If you are a professional trumpet player, the music industry is the same. Whether you are an amateur or a professional, don’t lose sight of the fact that trumpet playing is fun. Don’t focus on the inept conductor or the drummer who adds an extra beat to the measure with every drum fill. When these or similar thoughts enter your mind, take a slow, deep breath and then smile. Focus instead on how the thrill of playing a musical instrument for others, and being able to share your talent, is something that just a small percentage of people in the world are privilege to do. And, you’re one of those lucky few!
5. Take a Lesson.
Our most precious commodity is time. A good teacher is worth their weight in gold because they can improve your playing in less time than you could on your own. Yes, there is a wealth of free information on the Internet on how to play the trumpet; however, you’ll spend more precious time searching, filtering out bad information, and grazing than if you had a guide to show you along the path.
One of my trumpet teachers still takes lessons himself every month. He’ll call up other teachers in the area (many of whom are his colleagues) to take a lesson. He also gets together with out-of-town players who are in the area on tour for lessons. This allows him to always expand his knowledge, improve his playing, and expand his bag of tricks to use for his own students.
6. Get Together With Others
Get together and practice with someone else. This may be playing duets, or you can go through your daily routine and trade off. There are plenty of benefits to this. First, you’ll have more fun than just sitting alone in your practice room like you would be normally doing. Second, you benefit more because you can share experiences, learn from the other person, and you can teach them as well. And third, you tend to have a better practice pace when you work with someone else because you take breathers to talk, laugh, or listen to each other.
7. Set Goals
The start of a New Year is always a good time to set new goals or reevaluate your existing ones. If you don’t have goals for your trumpet playing, start setting them! They may be long-term or short-term. I recommend a combination of both. I set goals for every practice session, jotting them down before I start playing. It may be a tempo I want to hit on a fingering or tonguing exercise, or a difficult passage I want to make easier.
Longer term goals should be written down as well. For some reason, writing them down tends to put them in motion better than just thinking about them. It may be a career goal, like playing in the Chicago Symphony. It may be tackling a challenging piece you’ve always wanted to play. It may be getting the nerves up to play in front of a group for the first time. Whatever your goal is, write it down and start heading towards it.
Image courtesy of imagerymajestic / FreeDigitalPhotos.net
8. Listen, listen, listen!
I find myself overwhelmed with things in my day that take up my time – work, family, Facebook, sleep, driving. I realized that listening to music has become a much less significant part of my day than it used to. I don’t remember the last time I listened to a Mahler Symphony or Miles Davis’ Kind of Blue from beginning to end without distractions. If you are like me, take a concerted effort this year to make the time to listen. We gain so much from listening to great music that cannot be achieved in the practice room. Hearing great musicians and absorbing different styles of music through listening translates directly into improvements in your own musicianship. Besides, hearing a live concert can be so inspiring that you’ll be reminded of why we do what we do!
Image courtesy of Apple’s Eyes Studio/freedigitalphotos.net
9. Perform!
Make it a point to get out and perform for people. No matter what your level of progress is, once you know 4-5 notes on the trumpet you can make music. You have the tools to connect emotionally with your audience. I’ve seen beginning band students who have been playing for less than a year make people smile and cry with the songs they play. You don’t have to perform at a symphony hall to move people. Play in church, search out a community band, or play at a local nursing home. When you start connecting with others through your playing, you’ll be inspired to do more, and have a sense of fulfillment that you don’t get from just practicing.
The thrill of playing a musical instrument for others and being able to share your talent is something that just a small percentage of people in the world are privileged to do.
What tips do you have? If you have your own tips I hope you’ll share them in the comments section below.
I am continually grateful for the care and attention that was paid me by my teachers in the areas of foundation, mechanics, technique and musical perspective. Where equipment was concerned they made it clear that the sound must be heard first in my mind, that I must solidify my musical ideas with strong repeatable skills, and that only as those skills gained in strength would good equipment become more and more meaningful. The message they gave to me is the same one I give to my students: In order to get the most out of your practice time you need to prioritize your practice categories. After you have developed efficient and appropriate practice habits you can then look for optimal equipment.
Although the beauty of a trumpet sound, along with its power and brilliant color is what we initially fall in love with, it is our foundation on the instrument that provides the superstructure upon which we build our mechanics and technique. The foundation of our playing is developed and perfected on a daily basis. It is often called the “warm-up” and usually includes mouthpiece work, lip slurs, scales, rapid articulation studies, double- and triple-tongue drills, and lip flexibility studies. My own foundation practice is a combination of selected exercises from the Max Schlossberg book (“Daily Drills and Technical Studies for the Trumpet”) and the James Stamp exercises from the book “Warmups Plus Studies”. I believe that these two books are the most important books of foundational studies for all players, regardless of the musical genre (classical, jazz, commercial, etc.) in which one performs. My advice to a developing player is to choose a teacher that teaches a strong foundation as the basis for subsequent technical and artistic achievement.
Good mechanics are built upon the foundation that we put into place for ourselves on a daily basis. The terms “mechanics” and “technique” are often used almost interchangeably, though I believe that is a mistake. They are two very different things. Proper mechanics create ease of production. Ease of production then supports consistent facile technique. Therefore, good technique is a result of correct mechanics. As an example, if I execute a passage with fast finger technique well on an occasional basis, it means that I am capable of mastering physical speed against a metronome. It does not mean that my finger rhythm is even or that the sound is beautiful, or that I will always be able to produce that technique on demand. Good mechanics will promote a facile and reliable technique, but executing feats of fast technique does not necessarily promote good mechanics.
Musical perspective is the “total picture” that results from combining intuitive and learned musical knowledge. It is the total of what we know expressed in sound. One’s musical perspective is most effectively expressed when one’s foundation, mechanics, and technique are in good working order. Oftentimes, a player’s musical perspective is more developed than his or her mechanics or technique. This is fine because it is still possible to achieve an excellent musical result at each technical and mechanical level. A strong foundation, a high level of mechanical skill, and a strong technique coupled with well-developed musical perspective will produce a superior and clearer sound picture every time. Practice time therefore, should be devoted to each of these aspects on an on-going and consistent basis.
A few words about equipment: I believe strongly in the value of the after-market valve alignment. When the valves are aligned properly the “bugles” in each combination become unified in color and timbre and instrument will then blow evenly. The horn is then optimized and will play as it was meant to play. I prefer the Bob Reeves valve alignment and have been depending on it for over 20 years. It never ceases to amaze me how happy my students are with their trumpets after they have invested in a valve alignment. The current-day valve alignment is one of the significant advances in trumpet technology because in optimizing the instrument it promotes correct trumpet mechanics by encouraging players to blow straight through the trumpet instead of “tipping” the air in the direction that the pitches are moving.
If after a valve alignment the instrument is still unsatisfactory, instead of immediately running out and buying a new mouthpiece you should first examine the resistance created by the relationship between the mouthpiece and the mouthpiece receiver. If your mouthpiece fits in the mouthpiece receiver too far or not far enough its resistance may be wrong for you. Your mouthpiece might need to penetrate the receiver a little more, or be pulled back a little in order to discover a more favorable resistance. If this produces the sound and ease of blowing that you prefer then purchasing a new mouthpiece is unnecessary. If you still find the sound and/or the “blow” lacking you may wish to buy a new mouthpiece and repeat the fitting procedure.
My last point is about trumpet mouthpieces. We are in a golden age of choice where mouthpieces are concerned: there are many fine manufacturers producing excellent models from which to choose. Try everything you want to try. When you hear what you like buy it, have it fitted properly to your instrument, and begin to work with it. Bear in mind that when you first try a mouthpiece and find it attractive, you are just getting a glimpse into what it can be and can do for you. Your facial muscles will not immediately be accustomed to the new position appropriate to the new mouthpiece. Consequently, the mouthpiece might play nicely for you for a week or less, and then begin to give you trouble by making you tire quickly, making your tone airy, marginalizing your range and so on. If you work with it, play scales on it, articulate on it, practice your lip-slurs, all the while practicing carefully and correctly, in about four weeks the mouthpiece will begin to give back to you what you first found attractive about it and you will enjoy its benefits.
This article is aimed at high school and college students in the hope that they may gain a little perspective about what they have ahead of them in studying trumpet. Practice “smart”, get a good teacher and good information about your equipment, and you will enjoy the learning process more and make greater strides in achieving your technical and artistic goals.
About Roy Poper
Roy Poper has for more than 30 years maintained an active performing career of a breadth rare among musicians. His engagements span every facet of trumpet performance including symphonic principal player (Los Angeles Chamber Orchestra and L.A. Opera), film studio work (over 500 major motion pictures), chamber music (founding member, The Modern Brass Quintet), and “popular” genres including jazz ensembles, Broadway shows, and even recordings with Frank Zappa and the Mothers of Invention.Equally respected as a teacher, he was for more than 20 years a member of the faculty of the University of Southern California School of Music prior to moving to Oberlin, OH in 2002 to assume the duties of Associate Professor of Trumpet at the Oberlin Conservatory. His book, Roy Poper’s Guide to the Brasswind Methods of James Stamp (Balquhidder Music), which serves as a companion to James Stamp Warm-ups and Studies (Editions BIM) has become an acclaimed addition to the trumpet method-book literature, thoroughly explaining how to execute and effeciently utilize James Stamps’ teaching methods.He continues to be in demand as a performer, performing frequently in the greater Cleveland Area and Los Angeles. He has commissioned numerous works, some of which appear on his forthcoming CD, L.A. Trumpet Works. Roy has been recorded on the Crystal, Orion, Nonesuch, and Dorian labels.
We have received many requests for the version of the Bill Adam trumpet routine that Larry Hall and Jerry Hey practiced together at Indiana University under their trumpet professor Mr. William “Bill” Adam. Larry and Jerry were generous to spend several hours researching and compiling the exercises they practiced along with some of the modifications.
They provided some examples of how they would modify individual exercises to keep them fresh and expand how they trained their ears. Be creative and come up with your own!
Larry Hall with John Snell
This routine is not intended as a one-size-fits-all approach to the trumpet. It should be used as an informative look into their daily routine and how they expanded the exercises.
The Trumpet Routine
Mr. Adam ascribed to the “rest as long as you play” concept. Practicing with a friend helped insure that and also gets one used to playing in front of others.
Our daily practice was broken up into sessions. None of this was rigidly adhered to. The 1st session was pretty much the same everyday, but sessions 2 and 3 were pick and choose to keep things fresh, interesting and challenge ourselves.
Our practice session times could total 4 to 5 hours. Mr. Adam always said 3 hours was a minimum comprised of an hour for: basic maintenance, technique, and solo and repertoire literature.
1st Session
Clarke #1- Start on F# in the staff, F, G and expand outward.
The rest of the 1st session of the day is all Schlossberg:
#6 – Start soft, Crescendo to next bar and Decrescendo
#23, 24,25, 27
#36B – Start with variation A, then variations 2, 3, 4 and 5 going up a half step with each variation.
# 95 – Sustain top notes resting or trading off with you partner at each breath mark.
#97* – The goal was to play in one breath. Keep air relaxed. This can be extended out to F#.
#99 & #100 – Play #99 as is resting at the end of each key signature, Start #100 on low F# and extend exercise to F# an octave up or keep going as high as you can.
#102a* – Each day pick a different variation of scales, (major, minor, harmonic minor). Also pick a variation of intervals, (3rds, 4ths, 5ths). Extend outward to F#.
#120-123, #128
*When extending #97 and #102a to F# both low and high, break up doing every one every day. Day 1, start #97 on C, go to B, C#, A, Eb, G, F. Start exercise #102a on C, go to Bb, D, Ab, E, F#, F#. On day 2 swap these patterns for each exercise.
BREAK
2nd Session
Next session start with Clarke 2nd , 3rd or 4th Study. Always start on E below the staff and expand outward to low F# and C in the staff. When playing the 2nd Study, change modes on each repetition, Major, Minor, Diminished scales.
Arban’s P. 14 #16-27 – Play each exercise twice, 1st time all slurred, REST, 2nd time all single tongued. Play a few articulated 8VA.
Arban’s #46-50 – Start with #47 and #48, transpose each in all keys. Then play #49, #50, then #46.
Schlossberg #45
Arban’s double tonguing P. 175, #77-94 – Play #88-90 in all keys
Some Arban’s triple tonguing
Schlossberg Chord Studies #70 single tongue, #71 slur 1st 2 notes tongue next 2, #73 All Slurred
Arban’s p.297 Characteristic Study #13 The goal is to play in one breath. “Never heard anyone make it!” – J
Other Arban’s :
p.39 #3,4,5. p.40, p. 41
p.138 #35, 38, p.140 #41-47
p.142-p.151, p.56
p.125 #1, p.135 #23
p.28-36 Single tongue 8th notes, double tongue 16ths.
Obviously not every exercise was played each day but this material would get covered during the week.
Saint-Jacome’s
157 Always single tongue, start with 1st exercise, 1st Variant triplets, #4 sixteenths, #11 sextuplets. The repeated G is in the staff, try playing all these variations with the repeated G above the staff. Once Mastered (J or L) try p. 161 and variations. CORNERS!!!!
OK, I THINK WE’VE HAD ENOUGH FOR A WHILE
BREAK
3rd Session
Start 3rd session with another Clarke
Arban’s Chromatic Triplets p.76, #1-5, p. 80, 10-23
Saint-Jacome’s Bugle Call p.19 #26, p.24, p.49 #3, p.68 & p. 81
Selection of Charlier or Bitsch etudes, Art of the Trumpet (Originally titled “Common Sense” by William Thiecke)
We usually finished off each day with Maggio Long Range Chromatic. 1st a flexibility pattern to start out loose. Slur from low C, G to C in the staff, lip trill between G and C then back to low C. Rest. Go down by ½ steps to low F#. Rest.
Play chromatically from low F# up to F# in the staff back to low F#, breath, F# in the staff chromatically down to low F# back up to F#. Breath. Start on low G and do the same pattern and continue to go up by ½ steps. Continue upward to as high as you can go. It does get better but never easier.
You Do Not trade off or rest till you’re done. And you WILL be done at this point.
Carroll Purviance, the custom mouthpiece maker that Bob Reeves apprenticed with in Hollywood, CA.
The first time I learned about the gap was on a visit to Elden Benge’s Burbank shop. He explained to me how he made his trumpet play better in combination with Bach mouthpieces, which were popular at the time. He moved the receiver on the horn back until it played the way he liked it. Benge’s goal was to find the gap that worked best, not find out what the gap was “supposed to be.”
When I went to work for Carroll Purviance in 1961 he had two shank sizes for his mouthpieces, his standard, and a smaller B shank. Purviance discovered that for some setups, one shank would play better than the other.
During that same period I was studying trumpet with John Clyman, who had his own theories about the gap. He believed that there should be at least some gap between the mouthpiece and leadpipe. This was contrary to another theory that suggested that very little, or no gap was best. Clyman would push me to work on mouthpiece projects for him in exchange for the lessons he gave me. He then bought my first lathe (which I still use today) and I opened up my own shop in the back of my Mother’s house.
Opening Up Shop
In April of 1968 I opened my shop in Hollywood, California and was fortunate to attract the top brass players in the world. My shop was a sandbox where we would try all the ideas we had on our minds. Some turned out good, some bad, but it was fun and a unique learning experience.
My experiences with Benge, Purviance, and Clyman, along with my day-to-day observations of players made me realize how crucial the gap really is. Discovering the proper gap was a time consuming process, requiring a lot of salvage work on customers’ mouthpieces. I would think that the gap should be increased so I soldered a new shank on the mouthpiece, only to find out that it should be smaller and had to file down the shank, or vice-versa.
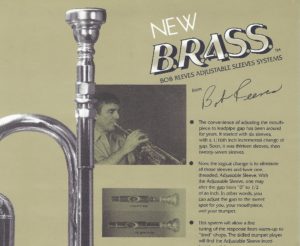
The Bob Reeves Sleeve SystemIt only took a few times of going through this painstaking process to figure out that there must be a better way. This planted the seed that grew into my adjustable sleeve system. Thanks to my friends Bill Cardwell and Don Macintosh, in 1974 I was granted my first patent for the sleeve system.
The Experimenting Continued
Originally, I made six different sleeve sizes that allowed a player to adjust the gap within 1/16″. It quickly became obvious that players required further fine-tuning, so I divided the sizes into 1/2 and 1/4 sizes, allowing players to adjust the gap within 1/64″. Due to the limitations of the manual lathe I was using, I could not reliably adjust the gap in smaller increments. Frustrated by this limitation and wanting to make even smaller adjustments to the gap, I turned my attention from the mouthpiece to the trumpet receiver.
Adjustable Gap Receiver
I
Ad for the B.R.A.S.S. adjustable-gap receiver designed by Bob Reeves – the first of its kind.
n 1979, I invented the first adjustable gap receiver for the trumpet. The gap could be adjusted within .001” by using a precision threaded bit. Over the next few years, I tested the gap extensively compiling several journals full of notes, observations, and most importantly, players’ perceptions.
I was surprised to discover that trumpet players can perceive a change in the gap as little as .006”! I also confirmed my belief that two different players playing on the same mouthpiece and same trumpet often will required a different gap.
I converted many trumpets with my adjustable gap receiver (The B.R.A.S.S., which stands for Bob Reeves Adjustable Sleeves System), but there were practicality issues with this system that made me reevaluate making gap adjustments using the mouthpiece. Thanks to advances in machining technology, adjusting the gap by using a converted mouthpiece and removable sleeves became feasible.
The Bob Reeves Sleeve System
The system as it exists today requires a mouthpiece to be converted for sleeves, which is much easier and more economical than replacing the receiver on a trumpet.
We can convert any trumpet mouthpiece to accept our sleeves, the process of which does not alter any other part of the mouthpiece — the backbore and overall length of the mouthpiece remain the same.
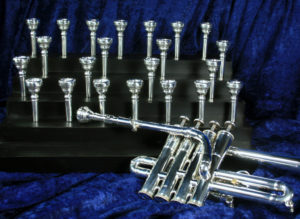
Our removable sleeves come in half sizes, ranging from #1 to #7. We also have quarter sizes available from time to time. The #1 sleeve has the largest shank size, which will produce the largest gap, while the #7 sleeve has the smallest shank size, producing the smallest gap.
Learn how to experiment adjusting your gap.
On a regular basis, we receive a call or email at the shop that takes on the same basic form:
“Hi, I play on a ABC mouthpiece on a XYZ model trumpet. What sleeve would give me the best gap.”
Usually, our customers are shocked when our answer is a resounding, “I don’t know!” After all, Bob Reeves invented and patented the adjustable gap receiver and sleeve system 40 years ago. How the heck couldn’t we know?
The answer is simple – we only know two of the three variables needed to determine the best gap and really, we don’t know any of the three variables unless we have your mouthpiece and trumpet here in the shop for analysis.
The Player-Trumpet-Mouthpiece System
It is critical to realize that there are three elements that must be analyzed in assessing your equipment – the trumpet, the mouthpiece, and you, the player. It seems silly, but most players forget the most important element – you!
How The Gap Relates to the Player-Trumpet-Mouthpiece System
Think of the gap as a fine tuning device. It is a way to dial in your trumpet, with your mouthpiece, to the way you like to play. Let’s say we know the exact size of your trumpet mouthpiece shank and the receiver on your trumpet. There is still no way we (or anyone else in the world, for that matter) can know what you like to feel in your trumpet equipment.
The Shoe Analogy
Think of it like shoes. Imagine you wear a size 9 shoe. Let’s go one step further and say you wear a 9 Wide shoe. I could send you 10 pairs of size 9W shoes and I would bet that some would feel more comfortable than others. In fact, I’d be willing to bet that there would be some shoes, despite being your measured size, will feel downright uncomfortable to walk around in. The best shoe salesman in the world cannot blindly tell you which brand will feel comfortable to you until you try them on.
Put Yourself First!
Just like the shoe analogy above, only you know what feels comfortable to you. Put another way, no one can tell you what will work for you (if they do quickly run the other way!).
So how do you find what works for you? Experiment. Our paper trick is a great way to discover what role the gap plays in your unique Player-Trumpet-Mouthpiece System.
Experiment with the gap using the Bob Reeves Paper Trick!
Here at Bob Reeves Brass Mouthpieces we provide many services and products that can improve the playability of your trumpet, including the most popular professional trumpet model, the Bach Stradivarius. Over Bob’s forty-five plus years of experience, he has found that these methods create real and immediately perceptible results.
1) Clean your trumpet and keep it that way!
If yesterday’s tacos and last Monday’s cheeseburger are still in your trumpet, they’re not helping you play better. An acid wash, or chemical cleaning, like our Premium Service acid wash removes all the gunk built up inside your trumpet. Part of our service also includes brushing out the inside of the entire body and slides of your trumpet, and the exterior brass legs of your slides. When your horn is clean inside and outside, we then lubricate all the slides and valves, getting the instrument into ready to play condition.
Once your instrument is cleaned out, you need to keep it that way to keep it playing consistently. For decades we have sold our Leadpipe Swabs to trumpet players, instructing them to swab out their horns at the end of each playing day. Our swabs remove the moisture and food particles from your leadpipe, stopping them from getting further into your horn, causing build up on the interior of your horn.
2) Bring your horn in for a Bob Reeves Valve Alignment!
Every horn manufactured today needs a valve alignment. Your 1960s Olds Ambassador, your early Elkhart Bach Strad, even your $30,000+ decorated Monette PRANA has misaligned valves. Not only will our valve alignment improve the way your horn plays, but it will keep it consistent from day to day. Bob first discovered the valve alignment working with top studio musicians after he opened his shop in Hollywood. These musicians would come into Bob’s shop complaining about consistency issues, and, knowing that the players weren’t changing, he looked to the instrument. When he aligned their valves, their equipment hunts would end. They no longer needed to play to how the trumpet was aligned each and every day, and had much more direction concerning improvements to their setup.
3) Find the gap that works for you!
Once you’ve had your valves aligned, you can really start making your equipment work for you. After a valve alignment, many players find it possible to play on a more efficient mouthpiece than previously. While a complete mouthpiece change may be deemed unnecessary, many players find it beneficial to “dial in the gap”. Our sleeve system allows the player to experiment with the gap, allowing them to find the correct gap that works for the trumpet, mouthpiece, and — most importantly — the player. Converting for sleeves also allows you to use one mouthpiece in two horns with the correct gap on both instruments. Not all trumpets are the same and not all mouthpiece receivers are the same; this is why the gap must be discovered on each individual instrument you play.
4) Accessorize!
Now that you have your horn cleaned, your valves aligned, and your gap dialed in, (or you just want a quick experiment) Bob Reeves Brass offers two products that improve the slotting of your trumpet. The Cylinder Reinforcer and Receiver Ring both work in similar ways. The receiver ring is a small silver plated ring that fit onto the hexagonal end of your Bach’s receiver, while the cylinder reinforcer, on a Bach trumpet, is a replacement bottom valve cap. Neither of these accessories cause a dampening affect to your trumpet, they instead solidify points on the instrument, preventing the loss of energy that you put into it. The junction between the mouthpiece and the receiver is a point where energy is commonly lost, but a receiver ring will solidify that junction, allowing the energy to continue through the horn. In the same way, the bottom of the third valve casing is a location where energy is lost, but the cylinder reinforcer prevents that dissipation.
Now that your trumpet is in it’s best playing condition, you can focus more on playing the music, so go and have fun!
With the holidays right around the corner, baroque music gigs are starting to show up on musician’s calendars, and what that means for the trumpet player is that it’s time to dust off their piccolo and get ready to perform. The holiday season repertoire of Christmas Oratorio, Messiah, and Magnificat is no easy blow and having to play it on piccolo doesn’t help. But, Bob Reeves Brass has some options that will make tackling these pieces a little easier so you can focus more on the music — and have more fun playing!
Modern Developments for the Piccolo Trumpet
In 2012 trumpet equipment has come a long way from what existed when the piccolo trumpet was developed. As piccolo trumpets are half the size of a regular Bb trumpet and have unique issues that need to be addressed, Bob spent many years coming up with the designs of his standard piccolo mouthpieces. The main difference between a standard trumpet mouthpiece and one of our piccolo trumpet mouthpieces is the length. Our piccolo trumpet mouthpieces are shorter than a regular mouthpiece. The same is true for the piccolo mouthpieces we make with a cornet shank. One of our piccolo trumpet mouthpiece with a cornet shank is shorter than a standard cornet mouthpiece.
There Are More Piccolo Mouthpiece Options Than Just a Bach 7EW
Any of the standard Bob Reeves rim and cup combinations can be ordered with a piccolo-trumpet shank or a piccolo-cornet shank. These pieces come with a backbore that Bob developed to play more evenly, better in tune, and with a better balance than the 117 backbore and other common piccolo backbores. The most popular cups players use with their piccolos are the S, M, and C. As with all Bob Reeves pieces, these pieces for piccolo come in a screw-rim configuration and, because of that, if you know you love a certain rim, we can thread it and make a piccolo underpart to it.
Reeves A-Adapter for Cornet-Shank Piccolo Trumpets
Another tool that we offer for cornet-shank piccolo players is our A-Adapter. This adapter, when used on the Bb side of your piccolo, brings the tuning down to the key of A and keeps you from having to pull a Bb tuning bit out very far to play in tune. This prevents a large gap from existing in your horn at the end of the tuning bit before the leadpipe. When this gap is eliminated, the piccolo with play much more in tune, with better response, and much more evenly.


 Roy Poper has for more than 30 years maintained an active performing career of a breadth rare among musicians. His engagements span every facet of trumpet performance including symphonic principal player (Los Angeles Chamber Orchestra and L.A. Opera), film studio work (over 500 major motion pictures), chamber music (founding member, The Modern Brass Quintet), and “popular” genres including jazz ensembles, Broadway shows, and even recordings with Frank Zappa and the Mothers of Invention.
Equally respected as a teacher, he was for more than 20 years a member of the faculty of the University of Southern California School of Music prior to moving to Oberlin, OH in 2002 to assume the duties of Associate Professor of Trumpet at the Oberlin Conservatory. His book, Roy Poper’s Guide to the Brasswind Methods of James Stamp (Balquhidder Music), which serves as a companion to James Stamp Warm-ups and Studies (Editions BIM) has become an acclaimed addition to the trumpet method-book literature, thoroughly explaining how to execute and effeciently utilize James Stamps’ teaching methods.
He continues to be in demand as a performer, performing frequently in the greater Cleveland Area and Los Angeles. He has commissioned numerous works, some of which appear on his forthcoming CD, L.A. Trumpet Works. Roy has been recorded on the Crystal, Orion, Nonesuch, and Dorian labels.
Roy Poper has for more than 30 years maintained an active performing career of a breadth rare among musicians. His engagements span every facet of trumpet performance including symphonic principal player (Los Angeles Chamber Orchestra and L.A. Opera), film studio work (over 500 major motion pictures), chamber music (founding member, The Modern Brass Quintet), and “popular” genres including jazz ensembles, Broadway shows, and even recordings with Frank Zappa and the Mothers of Invention.
Equally respected as a teacher, he was for more than 20 years a member of the faculty of the University of Southern California School of Music prior to moving to Oberlin, OH in 2002 to assume the duties of Associate Professor of Trumpet at the Oberlin Conservatory. His book, Roy Poper’s Guide to the Brasswind Methods of James Stamp (Balquhidder Music), which serves as a companion to James Stamp Warm-ups and Studies (Editions BIM) has become an acclaimed addition to the trumpet method-book literature, thoroughly explaining how to execute and effeciently utilize James Stamps’ teaching methods.
He continues to be in demand as a performer, performing frequently in the greater Cleveland Area and Los Angeles. He has commissioned numerous works, some of which appear on his forthcoming CD, L.A. Trumpet Works. Roy has been recorded on the Crystal, Orion, Nonesuch, and Dorian labels.


 The first time I learned about the gap was on a visit to Elden Benge’s Burbank shop. He explained to me how he made his trumpet play better in combination with Bach mouthpieces, which were popular at the time. He moved the receiver on the horn back until it played the way he liked it. Benge’s goal was to find the gap that worked best, not find out what the gap was “supposed to be.”
When I went to work for Carroll Purviance in 1961 he had two shank sizes for his mouthpieces, his standard, and a smaller B shank. Purviance discovered that for some setups, one shank would play better than the other.
During that same period I was studying trumpet with John Clyman, who had his own theories about the gap. He believed that there should be at least some gap between the mouthpiece and leadpipe. This was contrary to another theory that suggested that very little, or no gap was best. Clyman would push me to work on mouthpiece projects for him in exchange for the lessons he gave me. He then bought my first lathe (which I still use today) and I opened up my own shop in the back of my Mother’s house.
Opening Up Shop
In April of 1968 I opened my shop in Hollywood, California and was fortunate to attract the top brass players in the world. My shop was a sandbox where we would try all the ideas we had on our minds. Some turned out good, some bad, but it was fun and a unique learning experience.
My experiences with Benge, Purviance, and Clyman, along with my day-to-day observations of players made me realize how crucial the gap really is. Discovering the proper gap was a time consuming process, requiring a lot of salvage work on customers’ mouthpieces. I would think that the gap should be increased so I soldered a new shank on the mouthpiece, only to find out that it should be smaller and had to file down the shank, or vice-versa.
The Bob Reeves Sleeve System
The first time I learned about the gap was on a visit to Elden Benge’s Burbank shop. He explained to me how he made his trumpet play better in combination with Bach mouthpieces, which were popular at the time. He moved the receiver on the horn back until it played the way he liked it. Benge’s goal was to find the gap that worked best, not find out what the gap was “supposed to be.”
When I went to work for Carroll Purviance in 1961 he had two shank sizes for his mouthpieces, his standard, and a smaller B shank. Purviance discovered that for some setups, one shank would play better than the other.
During that same period I was studying trumpet with John Clyman, who had his own theories about the gap. He believed that there should be at least some gap between the mouthpiece and leadpipe. This was contrary to another theory that suggested that very little, or no gap was best. Clyman would push me to work on mouthpiece projects for him in exchange for the lessons he gave me. He then bought my first lathe (which I still use today) and I opened up my own shop in the back of my Mother’s house.
Opening Up Shop
In April of 1968 I opened my shop in Hollywood, California and was fortunate to attract the top brass players in the world. My shop was a sandbox where we would try all the ideas we had on our minds. Some turned out good, some bad, but it was fun and a unique learning experience.
My experiences with Benge, Purviance, and Clyman, along with my day-to-day observations of players made me realize how crucial the gap really is. Discovering the proper gap was a time consuming process, requiring a lot of salvage work on customers’ mouthpieces. I would think that the gap should be increased so I soldered a new shank on the mouthpiece, only to find out that it should be smaller and had to file down the shank, or vice-versa.
The Bob Reeves Sleeve System
 It only took a few times of going through this painstaking process to figure out that there must be a better way. This planted the seed that grew into my adjustable sleeve system. Thanks to my friends Bill Cardwell and Don Macintosh, in 1974 I was granted my first patent for the sleeve system.
 n 1979, I invented the first adjustable gap receiver for the trumpet. The gap could be adjusted within .001” by using a precision threaded bit. Over the next few years, I tested the gap extensively compiling several journals full of notes, observations, and most importantly, players’ perceptions.
I was surprised to discover that trumpet players can perceive a change in the gap as little as .006”! I also confirmed my belief that two different players playing on the same mouthpiece and same trumpet often will required a different gap.
I converted many trumpets with my adjustable gap receiver (The B.R.A.S.S., which stands for Bob Reeves Adjustable Sleeves System), but there were practicality issues with this system that made me reevaluate making gap adjustments using the mouthpiece. Thanks to advances in machining technology, adjusting the gap by using a converted mouthpiece and removable sleeves became feasible.
n 1979, I invented the first adjustable gap receiver for the trumpet. The gap could be adjusted within .001” by using a precision threaded bit. Over the next few years, I tested the gap extensively compiling several journals full of notes, observations, and most importantly, players’ perceptions.
I was surprised to discover that trumpet players can perceive a change in the gap as little as .006”! I also confirmed my belief that two different players playing on the same mouthpiece and same trumpet often will required a different gap.
I converted many trumpets with my adjustable gap receiver (The B.R.A.S.S., which stands for Bob Reeves Adjustable Sleeves System), but there were practicality issues with this system that made me reevaluate making gap adjustments using the mouthpiece. Thanks to advances in machining technology, adjusting the gap by using a converted mouthpiece and removable sleeves became feasible.
 Modern Developments for the Piccolo Trumpet